Cannabis Rolling Insights
How to Roll a First Joint That Doesn't Look Like a Pool Noodle
Almost every first joint comes out looking like a soggy carrot. Anyone who has passed a joint around with a first-time roller has watched it happen. The new roller holds up their work, looks at the more experienced person in the circle, and asks the same question every time. "How does it look?" Probably a bit floppy. However, you can get pretty close to a clean cylinder on the second or third try if you fix the four things people usually get wrong.
This is a quick field guide. No history of rolling papers, no opinions about which brand is best. Just the moves that turn a wobbly first joint into one you would proudly pass.
Quick answer
To roll a first joint that looks decent, grind the flower to an even medium texture, build a tight crutch or use a reusable tip at the mouth end, distribute the flower along the paper with a slight taper toward the front, tuck the paper around the crutch, pack the open end gently, and twist it shut. Most wobbly first joints come from uneven grind or a low quality crutch.
Grind your flower finer than you think
The first reason a joint looks weird is that the flower inside it is spread unevenly. Chunks create lumps. Lumps split the paper, and they make the roll look like an elbow joint instead of a cannabis joint. Big chunks also burn in canoes, where one side runs ahead of the other and the joint goes lopsided halfway through the session, wasting precious flower.
A good rule of thumb: if you can still pick out distinct bud shapes, keep grinding. You want a texture closer to loose tobacco than Nerds candy. A four-piece grinder with a kief catcher will get you there in about 20 seconds.
For balance, don't grind so fine that you get powder. Powder packs too tight and chokes the airflow. The middle is where you want to live.
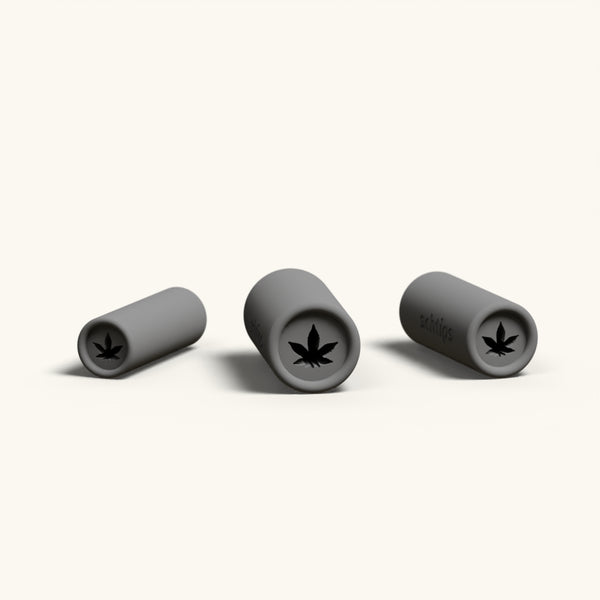
Use a tip (also called a crutch)
The piece of rolled-up cardboard at the end of a joint has names depending on who you ask. Crutch. Tip. Filter. Mouthpiece. They all describe the same thing: a small cylinder of cardstock or a reusable joint filter tip that sits at the mouth end of the joint and does three jobs at once.
It gives the joint a fixed inner diameter at one end, which makes the cylindrical shape way easier to build around. It keeps your lips off the wet end of the paper, which is an important improvement. And it stops the bits of plant material from getting pulled through into your mouth early on.
I have watched friends hold up a first attempt and ask whether it counted as a real joint. The honest answer often traces back to "you didn't use a tip" or "your tip is falling apart." A tip will not make a sloppy joint perfect, but it will make a sloppy joint look intentional.
Schtips happens to make a reusable version of this. The size you pick depends on whether you want a pinner (small), a classic (medium), or a fatty (large), which lines up with how thick a joint you want to roll. The Standard tier set covers all three sizes and runs around twenty-five bucks. Once you have a reusable tip in your kit, you stop relying on inconsistent cardstock, and you stop running out of them at exactly the wrong moment. We will leave it there. You can roll a perfectly good joint with a strip torn off the inside of the paper pack, too. Our tip is: use something as a crutch. It'll help your roll substantially.
Pack the joint before you roll it, then again after
Many people treat the roll as one continuous motion. It is actually two passes.
First pass: get your paper folded into a shallow trough, with the tip already seated at one end. Load the flower in along the trough. Now, before you roll anything, run a finger gently down the length of the joint and pack the flower toward the tip end. You are trying to get an even, lightly packed line of flower with no air gaps along its length. This is the most-skipped step. It is also why most first joints have hollow spots that run too hot.
Second pass: after you have rolled and sealed the joint, take a long thin object (a pen cap, a chopstick, the corner of a lighter) and tamp the flower down from the open end. You are looking for resistance, not compression. You want it firm enough that the joint holds its shape, loose enough that air still moves through. Close the open end with a small twist of the paper.
Lick less than you think
The lick is where new rollers either undershoot or drown the paper. Both are bad. Drowning the gum strip is the more common mistake. A wet paper takes too long to seal, the glue runs unevenly, and the joint either splits open mid-light or burns lopsided because one side of the seam is heavier than the other.
The right amount of moisture is a thin film, not a dripping line. Run your tongue over the gum strip the way you would seal an envelope. One pass. Two if the paper is dry, never more. Press the seam shut against the loaded trough with light pressure and hold for a couple of seconds. The gum will do the rest.
If you are still struggling to get your paper to stick, we have a dedicated post on how to make your joint paper stick every time. It will help you filter out those heart-wrenching rolls that fall apart right after they come together.
Your first joint is going to look like a first joint
That part is fine. It is going to burn, it is going to do its job, and the people you are smoking with have rolled plenty of worse ones. A friend of mine took years off and recently came back to rolling. The first thing he asked was whether it really was like riding a bike. The honest answer is: kind of. You lose the muscle memory in six months, and you get it back in three rolls.
The four moves above will tip the scales toward your joint looking like a confident first attempt rather than a nervous one. Grind it fine. Use a tip. Pack twice. Lick once. Everything else is just practice.
If you run a dispensary and want your logo built into the tip itself, you can request a free render and we'll send back a preview of what a Schtip with your brand on it looks like before you commit. Otherwise, papers, lighters, and rolling extras live over in our rolling accessories collection if you need to round out a kit.